Exploring the realm of DIY siding installation, this introductory piece aims to captivate readers with an intriguing narrative, blending formal language style with a touch of casualness to keep readers engaged right from the start.
The following paragraph will delve into the specifics of the topic, providing a comprehensive overview of the process.
Preparation
Before you begin the process of installing siding on your own, it is crucial to gather all the necessary tools and materials. Additionally, preparing the work area and following safety measures are essential steps to ensure a successful installation.
Tools and Materials Needed:
- Vinyl siding panels
- Siding nails or screws
- Hammer or screw gun
- Tape measure
- Level
- Tin snips or utility knife
- Siding removal tool
- J-channel
- Caulk gun
Importance of Preparing the Work Area:
Before you start installing siding, make sure to clean the work area of any debris or obstructions. This will ensure a smooth and level surface for installation. Additionally, check for any underlying issues, such as rot or mold, that may need to be addressed before putting up the siding.
Safety Measures:
- Wear safety goggles and gloves to protect your eyes and hands from debris and sharp edges.
- Use a sturdy ladder and make sure it is placed on stable ground to prevent falls.
- Avoid working in wet or windy conditions to ensure your safety and the quality of the installation.
- Be cautious when using power tools and follow the manufacturer's instructions to prevent accidents.
Choosing the Right Siding
When it comes to choosing the right siding for your DIY installation project, there are several factors to consider. From the type of material to the style and color, your decision will impact the overall look and durability of your home's exterior.
Types of Siding Materials
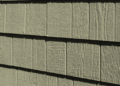
- Vinyl: Vinyl siding is a popular choice due to its affordability, low maintenance, and wide range of colors and styles.
- Fiber Cement: Known for its durability and resistance to fire, water, and pests, fiber cement siding is a long-lasting option.
- Wood: Wood siding provides a classic, natural look but requires more maintenance to prevent rot and insect damage.
- Aluminum: Lightweight and easy to install, aluminum siding is a cost-effective option that can withstand harsh weather conditions.
Factors to Consider
- Climate: Choose a siding material that can withstand the weather conditions in your area, whether it's extreme heat, cold, or moisture.
- Budget: Consider the cost of the siding material, as well as any additional expenses for installation and maintenance.
- Style: Select a siding style that complements the architectural design of your home and reflects your personal taste.
- Maintenance: Determine how much time and effort you're willing to invest in maintaining your siding to keep it looking its best.
Calculating Siding Amount
To calculate the amount of siding needed for your project, measure the height and width of each wall where siding will be installed. Multiply the height by the width to get the square footage of each wall. Add up the square footage of all walls to determine the total area to be covered.
Consider purchasing extra siding to account for any cutting or waste during installation.
Installing the Starter Strip
Before you can start installing the siding on your own, you need to ensure that the starter strip is properly in place. The starter strip serves as the foundation for the rest of the siding, providing a level base for the panels to be attached securely.
Steps for Properly Installing the Starter Strip:
Here are the steps you need to follow to install the starter strip correctly:
- Measure and Mark: Begin by measuring the length of the wall where you will be installing the siding and mark the placement of the starter strip accordingly.
- Cut the Strip: Using a saw, cut the starter strip to the measured length, ensuring it fits perfectly against the bottom of the wall.
- Secure the Strip: Nail the starter strip into place along the bottom edge of the wall, making sure it is level and securely attached.
- Overlap Joints: If you need to use multiple starter strips to cover the entire length of the wall, make sure to overlap the joints by a few inches for a seamless finish.
By following these steps, you can ensure that the starter strip is properly installed, providing a solid foundation for the rest of the siding to be attached securely.
Placing the First Panel

When it comes to installing siding on your own, placing the first panel correctly is crucial for ensuring a seamless finish. This step sets the foundation for the rest of the siding installation process.
Aligning and Securing the First Siding Panel
- Start by aligning the first siding panel at the bottom corner of the wall, making sure it is level both horizontally and vertically.
- Use a level to ensure the panel is straight before securing it in place.
- Secure the panel by nailing it into place, making sure to leave a small gap at the top to allow for expansion and contraction.
Cutting the Siding Panels to the Correct Size
- Measure and mark the siding panels according to the size needed for each section of the wall.
- Use a circular saw or a utility knife to cut the panels to the correct size.
- Make sure to wear appropriate safety gear when cutting the siding panels.
Overlapping Siding Panels for a Seamless Finish
- When installing the next panel, overlap it with the previous panel according to the manufacturer's instructions.
- Ensure the overlap is tight to prevent water infiltration and to maintain the structural integrity of the siding.
- Continue overlapping the siding panels in this manner until the entire wall is covered for a seamless and professional finish.
Installing Subsequent Panels
After placing the first panel and starter strip, it's time to continue with the installation of the subsequent siding panels. This step is crucial in ensuring a seamless and professional finish to your siding project.
Handling Obstacles
When encountering obstacles such as windows, doors, or corners during the installation of siding panels, it is important to approach each situation with precision and care.
- For windows and doors, measure and cut the panels to fit around these openings accurately. Use a level to ensure the panels are aligned correctly.
- When reaching corners, cut the panels at the appropriate angle to create a clean and seamless transition. Make sure to leave a small gap for expansion and contraction.
Ensuring Consistent Spacing
Consistent spacing between siding panels is essential for a uniform and professional appearance. Here are some best practices to follow:
- Use spacers to maintain even spacing between panels. This will help prevent buckling or warping over time.
- Check the alignment and spacing of each panel as you go along to make any necessary adjustments before securing them in place.
Finishing Touches
When it comes to finishing touches for your siding installation, paying attention to detail can make a big difference in the overall look and longevity of your project. Here's how to complete the final steps for a polished finish.
Finishing the Top Row of Siding
To finish the top row of siding, measure and cut the final piece to fit the remaining space. Make sure it aligns with the top edge of the previous panel for a seamless look. Secure it in place using nails or screws, ensuring it is level and properly aligned with the rest of the siding.
Securing the Final Panels
Once the last panel is in place, make sure to secure it properly to prevent any movement or damage. Nail or screw the panel into the studs behind the wall, ensuring it is tightly fastened. This will help maintain the integrity of the siding and prevent any gaps or shifting over time.
Caulking, Painting, or Staining
After all the panels are installed, consider caulking the joints and edges for added protection against moisture and pests. Additionally, painting or staining the siding can enhance its durability and aesthetics. Choose a high-quality exterior paint or stain that is suitable for the material of your siding and follow the manufacturer's instructions for best results.
Closure
Concluding our discussion on DIY siding installation, this final segment wraps up the key points in a compelling manner, leaving readers with a lasting impression of the topic.
FAQ Summary
What safety measures should be taken during the installation process?
Safety measures such as wearing protective gear, using stable ladders, and working with a partner to ensure safe handling of materials should be followed.
How do you calculate the amount of siding needed for the project?
To calculate the amount of siding needed, measure the height and width of each wall to be covered and multiply these dimensions to get the total square footage.
What is the purpose of a starter strip in siding installation?
A starter strip ensures the first row of siding is level and provides a secure base for subsequent panels to be installed correctly.
How can you ensure consistent spacing between siding panels?
Using spacers or measuring tape can help maintain consistent spacing between siding panels for a neat and professional finish.


